
ONLINE EDITION!
PRINT
DIGITAL

FAMILY - FAMILY FEATURES
Family Craft Corner
Holiday Pinwheel Ornaments
December, 2004 - Issue #3
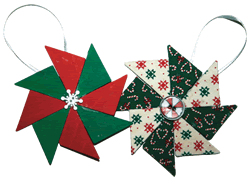 |
Here's what you'll need for one pinwheel:
• 8 11/2-half by 2-inch Woodies triangles
• 1 2-inch Woodies square
• 2 6-inch by 8-inch scraps of fabric (if only two types of fabric will be used)
• 1 21/2-inch square piece of fabric (for the square holding everything together)
• 1 7/8-inch button
• 1 8-inch piece of ribbon or cord for hanger
• fabric glue
• acrylic paints, clear sealer
First, protect your work area with newspaper. If your family chooses to paint the pinwheels, decorate the individual pieces to your liking and allow them to dry completely. On the back of the square piece, mark its center with a pencil. Fold the ribbon or cord hanger in half and glue the ribbon's ends to the center of the point you just marked.
Flip the square over, mark the center of the square on this side, and begin gluing triangles around the center point. You should use alternating colors to create a great pinwheel design.
After your triangles are in place, glue your button to the center of the pinwheel. Weigh your creation down with a heavy object for one hour, then remove the weight and let it dry overnight.
If you choose to cover your pinwheel pieces in fabric, use the Woodies as templates to cut the material. Each Woodie will require two small pieces of fabric: one piece that is slightly larger than the Woodie (leaving a margin of approximately 1/4-inch) and one piece the exact size of the Woodie. Use the larger piece to wrap the Woodie in fabric, folding the edges of the material over the back side of the piece as an anchor. The smaller piece should be glued to the back side of the Woodie as a way to cover the raw edges for a finished look. You may want to glue the smaller piece to the square Woodie after you've attached the ribbon or cord.

|
||||||||||||||||||||||||||||